Tuesday 20 December 2016

Happy Holidays - See you in 2017!!! (Christmas Gift Inside!)

It has been a weird year wouldn't you say? If you keep up with world news, I think you will agree. So in keeping with the theme, my Christmas gift to you for 2016 is a link to a weird thing I came across in Revit earlier in the year! 

Click to open your gift.

Revit Link in 2016
What I want for Christmas: Mavic Drone by DJI 


I will be taking a break from posting and will be back sometime in January! So stay tuned!
Wishing everyone a safe and happy holiday and New year!


Monday 19 December 2016

Dynamo Player with Unnamed Reference Planes

In October Autodesk released Revit update '2017.1'. I posted a few links in a blog post here
With the 2017.1 update came the 'Dynamo Player'. The Dynamo player allows you to run DYN files without having to open them in Dynamo. The interface is easy, simply click 'Play' to run the graph. 
The player comes pre-configured with a set folder that you can change to any new destination. The player will then list all your DYN files contained in the folder. 
Earlier in the year I wrote about what is probably the easiest Dynamo graph, a single node from the archi-lab package. You can read more about it hereThe Dynamo Player now lets you clear your unnamed reference planes by just clicking play! 

I really think this will make integrating graphs into office workflows much easier, especially for those users who were perhaps a little intimidated by opening and using a graph. 

The player isn't perfect, yet. At the moment it doesn't allow for input, but it is in the pipeline!  

Thursday 15 December 2016

Insight 360 - Known Glitch with 2017.1 Update

**Updated 17/12/2016
In October the Insight 360 team at Autodesk wrote a post about the recent 2017.1 Revit update. (Read the blog post HERE)As part of the update, the Insight 360 panel received an update in its appearance, upgrading to the 'Energy Optimization' panel, as well as a few other changes to streamline the tool set. 
The update means that if you have Revit 2017.1, you no longer need to install the Insight 360 plugin separately. 
Image Courtesy Autodesk

Unfortunately, when I upgraded to Revit 2017.1, my Insight 360 panel did not update... <Insert sad face>

After some back and forth at the Autodesk forums and a few others chiming in and reporting the same issue Autodesk took a look at the problem. So far they have drawn a link between the Microsoft Windows Region & Language settings (no I am not kidding) and the failed panel update.

Reports from the Autodesk forum boys/girls suggest that if you have U.K. language settings set on your PC when installing 2017.1, you may experience problems. 
If you need a quick fix, the solution is to uninstall Revit 2017, change Windows language settings to U.S. and reinstall Revit 2017 and 2017.1 update. 

I will post an update when a hotfix is released.

**I spoke a moment too soon. Woke up this morning with a message saying a hotfix has been released yesterday. I have installed the hotfix and it has fixed the issue for me, so I now see the new energy optimization panel, great! 
This is a link to the hotfix on the Autodesk Knowledge Network. 

Tuesday 13 December 2016

Revit Ducts - Bottom Offset & Justification

I don't often use the 'Duct' tool, so when dealing with them recently I had to learn some new and in my opinion weird 'Duct & piping' rules. 

When placing ducts the offset value is always to the centre of the duct, even if you set the offset justification to bottom! When you first place a duct, the offset value will respect the justification you assign to it. Things get trippy when you want to edit the ducts (which is what I had to do). 

When adjusting the ducts after placement the default 'offset' represents the middle of the duct, even if you change offset to 'bottom'. As you can imagine, this was causing some confusion and as it happens, this is as designed behaviour. It means that when adjusting duct heights, you need to take into account other parameters. 


Rather than go into more detail on this behaviour myself, I thought I would just provide a link to a very good post I found on the subject by Doug Bowers at 'aectechtalk'.
In THIS post he explains the behaviour and how to deal with it. The article was written in 2014, but I have since dropped by the autodesk mech forums to confirm nothing appears to have changed in recent versions.
A link to his blog post can be found HERE


Friday 2 December 2016

Learning Dynamo: 'Dynamo Thoughts' YouTube Videos

Interested in learning Dynamo? Bill Debevc (from the BIM Thoughts podcast) and Ian Siegel (voice of this Dynamo Lynda.com course) have started a YouTube channel titled 'Dynamo Thoughts'.

This from their 'about' page....
"DynamoThoughts is a new concept in video learning, instead of the usual "sit and watch" videos, DynamoThoughts format is different. Ian takes program suggestions from you and me. He then figures out how to program our suggestions in Dynamo. Now comes the exciting part, I watch and learn from Ian. Then I do it again from scratch learning, making and correcting mistakes as I go. We think this is an excellent way to learn, even something as complex as Dynamo."

You can visit 'Dynamo Thoughts' HERE and subscribe. 

'Dynamo Thoughts' YouTube Videos

Monday 21 November 2016

V-Ray 3 for Revit Now Available!

I wrote briefly about V-Ray beta version earlier in the year and a few months later The Revit Kid posted a guest blog on a V-Ray case study by Sam Davis. (A good read if you're interested). 

Well, now it's official, V-Ray 3 for Revit is now available!! This is great news and I look forward to reading and seeing some examples from the rendering pro's out there. I will have to re-acquaint myself with the software before next semester so I can show my students too! 

Wow, Enscape, Maxwell Render, Octane Render and now V-Ray, just to name a few... if you're keen on rendering your Revit models, you're certainly not short on choice these days!! 

Click the image below to see a clip of the Chaos Group promo video, giving a familiar Revit model some V-Ray treatment!

(Image: courtesy Chaos Group website)

Monday 14 November 2016

Revit & Hardware on 'BIM Thoughts'

I get a lot of questions about the best machine to buy for Revit, particularly from students as Revit is arguably the most demanding software package they deal with in the course. 

If you are in the market for a new workstation, have questions about RAM vs CPU or want to geek out on hardware talk, then head over to BIM Thoughts, Episode 52! Bill & Carla talk with BIM Manager, Tom Whitehead about how he picked his new workstations. Some interesting stuff!


Thursday 13 October 2016

Revit 2017.1 Released

Latest news from Autodesk, Revit 2017.1 has been released! Yes, this is the same as 'Release 2' per previous years. 

Visit 'Inside the Factory' to get the latest updates...
http://insidethefactory.typepad.com/my_weblog/2016/10/announcing-revit-20171-.html

Visit Autodesk What's New...
http://help.autodesk.com/view/RVT/2017/ENU/?guid=GUID-E287E537-7122-4ED8-8845-B8E24F287B62

The 'Read Me' information can be accessed here...
http://up.autodesk.com/2017/RVT/Autodesk_Revit_2017.1_Readme.htm

YouTube videos of new features are here... 
https://www.youtube.com/playlist?list=PLY-ggSrSwbZpsbhzUk5l2OurhCMGVt1j6

Thursday 22 September 2016

Curved Forms in Revit - 'Update to Face'

In my last blog I wrote about creating curved forms in Revit using massing tools. I demonstrated one method I use, the technique of lofting
As mentioned in that post, once you have completed your mass form, you can add model components to the faces to build up your conceptual model.
What if you want to change the form though? Well Revit takes care of that with the 'Update to Face' tool. 
Update your massing form as desired, then click finish. Now select the components that are no longer matching the new form and from the contextual ribbon, click 'Update to Face'. 
If the changes aren't too far from the original, Revit should have no problem doing this. I do come across limitations though if I depart too far from the original form. Also, if you dissolve the form and add new profiles, the components will lose their association with the surface and 'Update to Face' won't work. This doesn't often bother me too much though as it is easy to just reapply the components. 

Thursday 15 September 2016

Curved Forms in Revit

A few days ago I attended a short lecture by a local architect. It was a lecture about a residential building they designed and built for their family. It was quite a beautiful building with great attention to detail. During the lecture, the speaker gave the audience a preview of current work, one in particular was a sketch of a curved building concept they were working on. The lecture was mostly attended by students and the speaker asked the audience, if anyone had 3Ds Max experience to come and see him, as they needed help on a digital model in the next few weeks! One of the students put up their hand and asked if they could do it in Revit instead, to which the speaker replied "No, everyone knows Revit can't do curved buildings"..... Wait...What?! 

I have heard this fallacy before. Just because you don't know how, doesn't mean you can't.

So today I thought I would demonstrate one method I use to create curved building concepts in Revit. Yes, that's right, it can be done! In-fact, I taught a number of classes this semester demonstrating this very topic. So I will use one of the examples I gave my 1st year students a few weeks ago. It is a building form inspired by 'The Sage Gateshead' Performing Art Centre in the U.K. by Foster + Partners, completed in 2004. It is a striking building defined by it's beautiful flowing curved shell which is covered with "3000 linen finish stainless steel and 280 glass cladding panels". It is a multi-award winning building and you can visit there website for more information here.

Source: http://www.fosterandpartners.com/projects/the-sage-gateshead/

There is a reason why I have chosen this building, reasons I will come to shortly. To begin, let's start with taking a look at the basic form we are exploring.

To create the form I started in Revit with basic In-Place massing tools in the project environment. You can also start in a Metric Mass family if you prefer. I usually create my curved forms using a series of profiles drawn with the model line or reference lines tools available when massing. These create the skeleton of the form. Then, once your profiles are in place you can use a lofting technique by selecting all the profiles and clicking 'Solid Form' to create the curved form.

In the image below, I have isolated my massing form and activated the 'X-Ray' tool to demonstrate the profiles used. Each profile was created with adjustments to height, angle of the plane & width of the footprint. While in the 'X-ray' view, you can adjust each profile as the building form evolves.


Now to the reason why this building serves as a good example. Here we can see some development images from Foster+Partners website. The first image is an actual physical model of their concept. See something familiar? Those profiles we were just looking at! 
Source: http://www.fosterandpartners.com/projects/the-sage-gateshead/
The second image demonstrates how they used computer modelling to help create the building form. 
Source: http://www.fosterandpartners.com/projects/the-sage-gateshead/
 
With the finalised form, you can start to add building components using the model by face tools. Walls, roofs, floors & curtain systems can be modelled by face. You can find all of these tools on the 'Massing & Site' ribbon.

Alternatively you can click on the drop down arrow under each of the previously mentioned tools on the Architecture ribbon and it will display a 'By Face' option.

In this example, I used a 'Curtain System' with a 1000x1000mm grid. Mullions were setup in the type properties. The last step was to create a panel design by adjusting my panel types, in this case, solid & glass panels.  

This is just one method you can use to create curved forms in Revit. There are many others, but I often teach students to try and think of forms in slices, rather than a complex solid.

Is it easier or more intuitive than other software? Maybe, maybe not, it really depends on the user & the software. The point is, you CAN create curved forms in Revit and with the addition of Dynamo it can only get better! 

Tuesday 6 September 2016

Warning! Revit Wish Ahead!

The warnings dialog in Revit could do with an overhaul in my opinion. The functionality is seriously lacking and everyone has the same gripe about the 'show' button taking you to useless views where the object isn't even visible. 
The need to close the dialog to attend to each warning has always bothered me. From a model management perspective, it would work better as a palette, in my opinion. There are many other things I would like to see improved for the warnings dialog so I have collated a number of my wish list items I have on the subject as well as other useful ideas I have read over the years on forums & blogs. In no particular order they are... 
  1. We should be able to 'Ignore' or 'accept' warnings we no longer want to see. This way, we get a true value of warnings to be concerned about in the project. We can't always please Revit and all its rules. Trying to create zero warning files is not a recommended endeavour. So this feature is a must
  2. When clicking "show" we should be able to nominate view types or specific views to search through. The number of times we are taken to a roof plan, site plan or worse elevation trying to see an internal door on ground floor is almost a running joke 
  3. It would be useful to be able to assign priority to "types" or "categories" of warnings - perhaps through a warnings 'options' dialog. Eg: Calculation warnings or duplicate warnings being given top priority etc
  4. With priority comes sorting. Being able to sort warnings by date to get the most recent warnings, or by user would be helpful. Sort by category is another example, so rather than see all warnings under 'duplicated type marks' I can sort by category and see all warnings effecting doors for instance
  5. We need an "isolate" button that isolates the offending objects in view. There are apps for this already that also colour code objects. It's an invaluable tool and would be great if it was tied into the rest of this list
  6. The ability to leave the warnings dialog open while resolving problems. We shouldn't have to close this dialog while working on warnings. Some warnings can be resolved by simply adjusting a parameter such as a base offset, type mark or similar. This could be achieved if the dialog could be kept open while being able to work in the model environment making fixes on the fly. As previously mentioned this would be solved if the warnings dialog was a palette 
  7. The ability to expand the size of the warnings dialog box. This has been applied to a number of dialog boxes over the last few releases, not yet the warnings dialog. Solved if it went to a palette design
  8. We often amend objects in Revit that affect dimensions. We are sometimes presented with a warning to proceed with the change via a warning to delete dimensions. Sometimes we can click 'Show'. More often than not, we can't or worse, Revit deletes the dimension first, so then when you click 'Show' it says 'No good view could be found'. If we don't click delete, we can't move forward. (In other words, you don't have a choice). I would like an option to see WHICH dimensions are being deleted before I am forced to remove them. This is currently flawed functionality for a software that is supposed to AID in coordination

  9. Warnings tagged with the user name that originally generated them. This would help tremendously with user training, responsibility and model management. This is not intended as a blame game tool, but understanding where errors occur can greatly aid in improving processes 
  10. We often want to copy ID's from warnings to select those objects using ID selection. At the moment, you have to remember the number or generate a report to copy and paste. A 'Copy ID's of Checked Items' button would be excellent for this purpose. This wish may prove void if item 5 were addressed or could be part of the function 
  11. Help menu provides advice to fix certain types of warnings. This should be accessible in the warnings Dialog. "See more Help on this warning" for example. It would help new users resolve issues they are unfamiliar with or provide steps to identify possible causes or methods to resolve the warning
  12. Pop up warnings should need acknowledgement by clicking 'OK' to stop them disappearing. Users can plow ahead and ignore simple stuff, slowly racking up silly warning messages. This is particularly evident when training my students or clients, some warnings go by so quickly users don't even see them. This could act like balloon notifications, giving you the option to adjust settings for warning dialog duration, transparency & approval etc.
  13. An option to 'expand' or 'collapse' all warnings! This should be a standard function whenever these types of + sign trees are used in my opinion. It's the 21st century, this should be standard stuff written into software. The fact we have to request it is ridiculous. (While your at it, how about getting this into the project browser too)
  14. Currently when selecting elements with warnings, the 'Show related Warnings' in the contextual ribbon displays. The interface could be improved by displaying a warning icon, on or above the object instead. Clicking the symbol would open the relevant warning as it currently does via the contextual ribbon. An alternative would be to introduce another selection colour for an object that has a warning associated with it
  15. Warnings relating to objects in closed worksets should be indicated to reduce confusion. Perhaps in brackets next to the warning it can say 'Workset is currently closed'

    So, is there anything I missed? Post in the comments if there is function you would like to see from the warnings tools. 

Thursday 1 September 2016

Do You Customise Your Quick Access Toolbar?

I think the Quick Access Toolbar in Revit is an underutilised tool. I very rarely see my clients or students use it beyond its default setup. The quick access toolbar (QAT) resides by default at the top of your screen adjacent the Revit application menu. 


The QAT has a setting drop down arrow on the far right. Here you will find options to dock the toolbar below the ribbon instead of above it. You can also turn on and off the default icons. The best thing though, is you can add your own tools from other ribbons to the QAT instead of having to switch between ribbons all the time. To do so, simply right click on a tool in one of your ribbons, and if Revit allows, select 'Add to Quick Access Toolbar'. 

Sure, in most cases you could just add a keyboard shortcut instead, but some people prefer a visual setup as opposed to using their memory all the time. I am a big user of keyboard shortcuts myself, but I usually reserve assigning keyboard shortcuts to tools I use on a daily basis. So many of the tools I add to my QAT, are tools I perhaps use less often, tools accessed via drop down menus or to keep the icon in view for quick feedback.

For example, the 'warnings' icon is on my QAT because I can quickly identify if there are warnings in my project/family files simply by seeing if the icon is active or not. Show Mass is another example of easily identifying if the tool is active in the view.
Settings & paste functions is an example of tools with drop down menus that are useful to have on hand much of the time as well. I also have shortcuts for most of my daily paste functions. 

There is no hard and fast rule to a good setup, it's going to be different for everyone. If you prefer your icon interface and want to reduce the amount of ribbon switching you are doing, the quick access toolbar might be what you are looking for.


There is a downside I should mention. The QAT setup and order of icons cannot be saved to the Revit.INI file. So with each upgrade or switch of a computer you will have to set it up again, or go without. That happens once a year for me, I can live with that. 

Monday 8 August 2016

Revit 2017 SP2 Released

Autodesk have released Service Pack 2 for Revit 2017. Check your Autodesk Desktop App or you can download the service pack from HERERelease notes are HERE.


I think it has been a relatively short period between service packs. SP1 was released in early June. I am thinking we may see more service packs in the coming months as well as the usual 'Release 2' updates Autodesk have been doing for the past few years for subscription customers. 

Tuesday 19 July 2016

Revit Ideas Forum

If you haven't already heard, back in May this year, at the Revit Technology Conference, Autodesk made an announcement regarding the new 'Revit Ideas Forum'. Essentially an official Autodesk space for everyone to post their product feature wishes! 

As expected, there are plenty of wishes being posted. As ideas gather support, Autodesk have recently marked a number of ideas as "Under Review", due to their popularity. As of today, the ideas marked are:

  • **"OR" function in filter rules
  • PDF linking support
  • **Dual monitor support
  • **Double patterns
  • Separate family browser
  • Sloped walls functionality
  • Ability to sort schedules in project browser
  • Topography improvements
  • Ability to create blank tables
  • Auto spell check
  • Improved stair functionality and control
  • Shared parameters in key schedules
  • Non-rectangular scope boxes
  • Improved view placement on sheets
  • Spell check in schedules
  • Autodesk Revit Viewer improvements
  • **Multiple selections in dialog boxes (such as filters)
  • Worksets in templates
Not a bad list so far. I have posted a couple of my own as well, (3D measuring, wall type reporting in doors & improved warnings dialog) so head over and vote or make a wish! 

In the forum, Autodesk have provided some options to filter the ideas, to make it easy to see all those under review. I noticed "Implemented" is one of those options. Obviously, as this is all fairly new, there aren't any currently marked as implemented, but no doubt Autodesk will be looking to change that fairly soon! I am quietly confident we can expect to see some of the above possibly as soon as 2018 release. Fingers crossed!! 

Update 17/08/2016
**As of this week, Autodesk have started marking ideas as 'Accepted' and added the idea to their 'road map'. Woo!! I have therefore updated the list above with asterisks for items marked as 'Accepted' at the time of writing.


Wednesday 13 July 2016

Revit 2017 - Text Justification

I have written a couple of posts now about the text issues in Revit 2017. I highlighted HERE, some of the areas to watch out for when upgrading and some problems I had with my families.

With service pack 1 for Revit 2017 released and semester 2 teaching commencing this week, I thought I would finally get around to upgrading a couple of my 'sample' projects I use on a regular basis for training. This would also prompt me to start fixing all my annotation families that are being affected by the 2017 update to text. 

First up was the window tag & I immediately came across some interesting behaviour. The 'W' character in my window tags is plain text & the number is a standard label. Due to the upgrade, the 'W' character was shifting down and slightly to the right. So this is what I went to fix.

This text is center justified, it's not justified left or right. In Revit 2016, shifting the text box toggles left and right, has no effect on the position of the character. 

In Revit 2017, it moves to the right! For many of my families, this is what is causing the letters to shift horizontally, as my text boxes are quite tight around the letter.

I tested this theory by opening a Revit 2016 family and increasing the size of my text box to give the letter room to "grow". Then I upgraded it in Revit 2017 and it did not shift horizontally. 

So, is this a glitch? I would say so. I can't think of a reason why you would make a deliberate change in behaviour such as this. It is worth pointing out that you are very unlikely to come across this particular problem with slabs of text that are center justified because, well, you wouldn't reduce your text box to the width of a single character for text notes, unless of course you wanted vertically running text. This was only made obvious to me, because I was dealing with a single character in a family. I am not suggesting this is affecting center justified notes in a drawing.

I have posted in the forums and sent it to Autodesk regardless, as I am curious about the response to this unusual behaviour.

You can watch this behaviour in the following video. I have placed a reference plane through the centre of the character so the move can be seen more clearly.


It is worth noting I have installed Service Pack 1. 

Saturday 11 June 2016

Revit 2017 SP1 Released (Some Text Issues Resolved)

Autodesk have released Service Pack 1 for Revit 2017. Check your Autodesk Desktop App or you can download the service pack from HERE. 

If you have been experiencing text issues as described in this Autodesk forum discussion, then this pack sounds like it will address those issues. The "Reported Issues Resolved" document can be found HERE

I installed the update and the steel connections 'No Matches' error mentioned in my last post, appears to still be an issue. 

Wednesday 8 June 2016

Revit Structural Connection Families 'No Matches'

The structural connection families in Revit 2017 aren't playing nice. There is a thread running on the Autodesk forum at the moment HERE, highlighting the issue. 

The problem appears to be with the component list from the type selector. Structural connection families appear in this list amongst other components in the project such as trees & desks. However, if a structural connection was the last component you placed, then when you go to select a new family later, the list displays 'No Matches'.

At the moment, the only way to fix this, is to select a component other than a steel connection family, right click and select 'Create Similar'. It will now display all the components in the list. 

As long as a Steel Connection family was not the last component you placed, you will not notice this problem. 

It seems this has been reported*, so this will either be in Service pack 1, which I hear is due very soon or we will have to wait for SP2 for a fix. 

I have demonstrated the problem in the following video. 


*Update: Autodesk have setup the following Knowledge Network link HERE.

Wednesday 18 May 2016

Creating a Helix in Revit Using Stairs

Revit doesn't have a helix tool. Why not? For many years now, I have seen a number of different ways to create a helix or spiral in Revit. Zach Kron at Buildz posted back in 2010 using families. HyunnWoo Kim posted in 2013 using adaptive components. I even posted about it myself in 2014 with a very basic method here.

The problem with all of these methods is I don't find them to be very straightforward. The other day I saw a question posted on the forums about how to create a helix and it got me thinking again if there was a better way to do this. (Dynamo was the obvious choice, but we'll come back to that).

So I asked myself, is there any other tool or object in Revit that creates a spiral or helix form? That's when spiral stairs popped into my head! So I opened up Revit and started to play, and this is what I came up with.


Dynamo is also another way you could go about creating a helix & spiral forms in Revit. HyunnWoo Kim posted again in 2015 and created a great video demonstrating the method.

Friday 13 May 2016

Upgrading to Revit 2017 - Text Issues in Detail

Last month I posted about my personal experience trialing a model upgrade to Revit 2017, to see what effect the latest text updates by Autodesk will have.

I came across a blog post this morning by Ben Bishoff at Ideate Software who has gone into more detail & comparison of these text updates. I thought it was a good article because it gave me a clearer picture of what exactly is happening to the text and how it is moving. (I also happen to use the calibri font used in his example). You can find the post HERE


*Insert Sad Face*

RTC Australia started yesterday and I am not there <insert sad face>. It is at the beautiful Hunter Valley in New South Whales. To make it worse, a friend of mine is there, and he keep's sending me cool stuff!! 

So to make up for this massive educational loss, I decided to go through some of the downloaded material from last year's event that I still haven't looked at. Material from sessions I didn't get to see because I was in another. It reminded me of the information overload you get at this event. Some of the material & feedback you won't get anywhere else either. Some bits of presentations though are kindly shared by the authors, like this one about sorting your parameters. I saw the full presentation of this in 2015 and it was information I am now using everyday in my training, family & template setup. 

If you haven't been before, start that draft email to management because it is certainly worth every penny. You can visit the RTC website for future events around the world in 2016. Venues aren't too shabby either! When was the last time you were at a conference surrounded by a golf course AND with a view like this... 

RTC Aus 2016 - Crowne Plaza, Hunter Valley, N.S.W
Image Courtesy of Mr Perez! 

V-Ray For Revit

In my new year post, I spoke about my interest in the beta version of V-Ray for Revit, released by Chaos Group late last year. I still haven't quite gotten to looking at in depth yet, however a case study recently shared by Sam Davis was published by Jeff Pinheiro at TheRevit Kid.com. 
Sam discusses his experience testing the beta version of V-Ray for Revit. I think he did a great job looking into detail of some of the pro's & con's, as well as some great rendering demonstrations of lighting & shadows.  

So thank you to Sam Davis for this case study. You can find it here at the therevitkid.com


Wednesday 27 April 2016

Free Revit Families and Sample Downloads from 'What Revit Wants'

Luke Johnson at 'What Revit Wants' has been very kind in sharing a very large list of Revit families, tips, tricks & workarounds.  

You can visit his post & the available downloads HERE

**Updated 13/06/2017: The link for the new What Revit Wants site has been reinstated, however the link to the original post is no longer available. I recommend visiting Luke's site and search for similar free families and content there. He has a number of other posts that may assist like this one: Free Family Content
To learn more about the What Revit Wants Site update, click here

Thanks Luke! 

Thursday 21 April 2016

Upgrading to Revit 2017 - Text Issues

There has been much hype about the Revit 2017 release. This year, Autodesk have released quite a few exciting new features which has got many people talking. Top of that list amongst others is the update to the text tools. I mentioned earlier in the week though, Autodesk also highlighted some upgrade issues to look out for. For me, the biggest ticket item for upgrade review was the text changes. 

Well, I just spent some time upgrading a few projects to Revit 2017 to test the upgrade problems Autodesk warned us about relating to text. It isn't pretty. Until now, I was only thinking text notes would be affected by the updates, it didn't even occur to me to think of everything else with text in it. That's right, think families.
From the projects I have tested so far, I will need to fix many of my annotation families, including all my reference tags. The text in many of them, now exceeds the limits of the tag design as you can see from some screenshots I have taken. 

Because text has gotten slightly larger, text notes overlapping is occurring all over the place. In some cases, it has messed with the location of where the leader is coming from. (It has moved the leader from the base of the paragraph to the side, causing some wierd long leaders). My titleblocks are also affected, along with keynotes, electrical symbols (some have text in them) & view references. 

I decided to test the OTB template and added a number of text notes, symbols and tags to a wall in Revit 2016. Then I opened it in Revit 2017. This is the affect to the OTB families. I have placed red detail lines so you can see the visual change more clearly. 
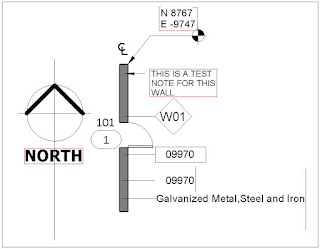
Revit 2016 Template

Upgraded in Revit 2017

The north point was interesting. More so, because I opened the Revit 2017 template and the family hasn't been updated by Autodesk. Trivial stuff, but it made me wonder how many of the families in their default libraries will be affected. As I mentioned, our titleblocks will need fixing, but in checking Autodesks titleblocks they appear largely unaffected. Text style and justification as well as the limits of the text box appears to minimise the damage. 

So it seems the negative affect to projects is going to vary depending on text styles your office uses, text spacing & how your reference tags are designed. Schedules are another victim of all this. Our schedules have gotten longer (due to the slight increase in text height). So if you were tight for space, you may need additional sheets. 

Below is an example of large amounts of text and schedules being updated. In this example, the text extends off the sheet and overlaps in some areas due to more than one text box being used. You will also notice the increase in length of the schedule.
Revit 2016

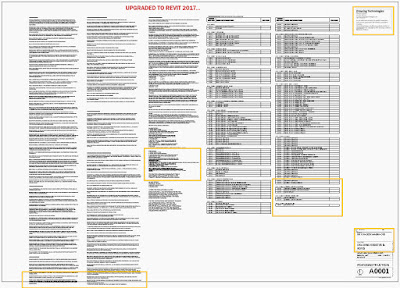
Upgraded to Revit 2017

I can't help but laugh though. This is a feature users have been asking for improvement on for the better part of 10 years. Is this a classic case of be careful what you wish for?? 

I was listening to the latest episode of BIMThoughts last night, where they discussed Revit 2017 new features. I think it was Steve Stafford author of Revit OpEd Blog who made an interesting comment about the text updates. He commented he would have liked all the effort that went into updating text to have gone into other things we really need due to the increase in data & metadata in models and less on text notes. Looking at our latest template and the changes we have in the pipeline, I understand where he is coming from. 

The reason being, we have gotten so use to the shortfalls with text in Revit we have adapted our workflows and reviewed our drawing standards around it. All our general notes that once covered our front sheet & plans are gone (creating proper lists and editing them was always a nightmare). Instead we rely on including these in the specification, preliminaries and trade sections for these types of general notes. (Which is probably how we should have always been doing it). 
All our abbreviation legends are generated using multi-category tagging & schedules as well as custom key schedules for standard keys, an example would be a door legend key. We have only a few symbol legends using the legend views tool in Revit, and none of the text in them uses lists anyway. We are also working on improving keynotes to take care of many of our notes throughout the drawing set.

So in thinking about it, perhaps I would have preferred them dedicating time to the problems surrounding leaders which will still affect all of the above & into the future. More control on their appearance, how & where they come off notes & tags, adding them to view references, handling of elbows when moving tags and text etc. 


Interesting thought.