Thursday 22 September 2016

Curved Forms in Revit - 'Update to Face'

In my last blog I wrote about creating curved forms in Revit using massing tools. I demonstrated one method I use, the technique of lofting
As mentioned in that post, once you have completed your mass form, you can add model components to the faces to build up your conceptual model.
What if you want to change the form though? Well Revit takes care of that with the 'Update to Face' tool. 
Update your massing form as desired, then click finish. Now select the components that are no longer matching the new form and from the contextual ribbon, click 'Update to Face'. 
If the changes aren't too far from the original, Revit should have no problem doing this. I do come across limitations though if I depart too far from the original form. Also, if you dissolve the form and add new profiles, the components will lose their association with the surface and 'Update to Face' won't work. This doesn't often bother me too much though as it is easy to just reapply the components. 

Thursday 15 September 2016

Curved Forms in Revit

A few days ago I attended a short lecture by a local architect. It was a lecture about a residential building they designed and built for their family. It was quite a beautiful building with great attention to detail. During the lecture, the speaker gave the audience a preview of current work, one in particular was a sketch of a curved building concept they were working on. The lecture was mostly attended by students and the speaker asked the audience, if anyone had 3Ds Max experience to come and see him, as they needed help on a digital model in the next few weeks! One of the students put up their hand and asked if they could do it in Revit instead, to which the speaker replied "No, everyone knows Revit can't do curved buildings"..... Wait...What?! 

I have heard this fallacy before. Just because you don't know how, doesn't mean you can't.

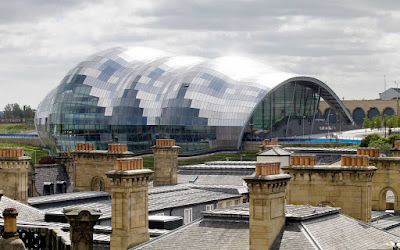
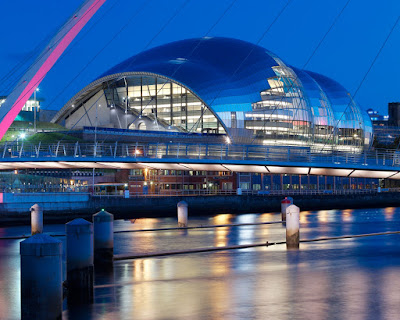
So today I thought I would demonstrate one method I use to create curved building concepts in Revit. Yes, that's right, it can be done! In-fact, I taught a number of classes this semester demonstrating this very topic. So I will use one of the examples I gave my 1st year students a few weeks ago. It is a building form inspired by 'The Sage Gateshead' Performing Art Centre in the U.K. by Foster + Partners, completed in 2004. It is a striking building defined by it's beautiful flowing curved shell which is covered with "3000 linen finish stainless steel and 280 glass cladding panels". It is a multi-award winning building and you can visit there website for more information here.

Source: http://www.fosterandpartners.com/projects/the-sage-gateshead/

There is a reason why I have chosen this building, reasons I will come to shortly. To begin, let's start with taking a look at the basic form we are exploring.

To create the form I started in Revit with basic In-Place massing tools in the project environment. You can also start in a Metric Mass family if you prefer. I usually create my curved forms using a series of profiles drawn with the model line or reference lines tools available when massing. These create the skeleton of the form. Then, once your profiles are in place you can use a lofting technique by selecting all the profiles and clicking 'Solid Form' to create the curved form.

In the image below, I have isolated my massing form and activated the 'X-Ray' tool to demonstrate the profiles used. Each profile was created with adjustments to height, angle of the plane & width of the footprint. While in the 'X-ray' view, you can adjust each profile as the building form evolves.


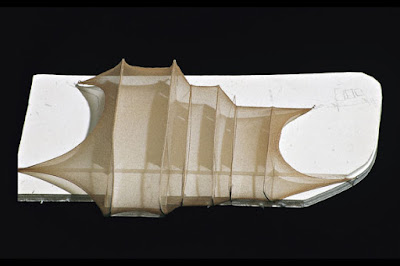
Now to the reason why this building serves as a good example. Here we can see some development images from Foster+Partners website. The first image is an actual physical model of their concept. See something familiar? Those profiles we were just looking at! 
Source: http://www.fosterandpartners.com/projects/the-sage-gateshead/
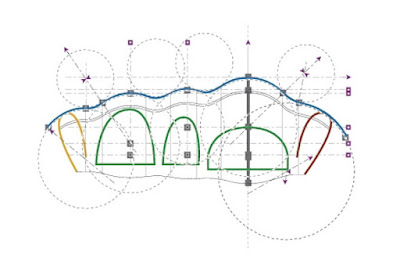
The second image demonstrates how they used computer modelling to help create the building form. 
Source: http://www.fosterandpartners.com/projects/the-sage-gateshead/
 
With the finalised form, you can start to add building components using the model by face tools. Walls, roofs, floors & curtain systems can be modelled by face. You can find all of these tools on the 'Massing & Site' ribbon.

Alternatively you can click on the drop down arrow under each of the previously mentioned tools on the Architecture ribbon and it will display a 'By Face' option.

In this example, I used a 'Curtain System' with a 1000x1000mm grid. Mullions were setup in the type properties. The last step was to create a panel design by adjusting my panel types, in this case, solid & glass panels.  

This is just one method you can use to create curved forms in Revit. There are many others, but I often teach students to try and think of forms in slices, rather than a complex solid.

Is it easier or more intuitive than other software? Maybe, maybe not, it really depends on the user & the software. The point is, you CAN create curved forms in Revit and with the addition of Dynamo it can only get better! 

Tuesday 6 September 2016

Warning! Revit Wish Ahead!

The warnings dialog in Revit could do with an overhaul in my opinion. The functionality is seriously lacking and everyone has the same gripe about the 'show' button taking you to useless views where the object isn't even visible. 
The need to close the dialog to attend to each warning has always bothered me. From a model management perspective, it would work better as a palette, in my opinion. There are many other things I would like to see improved for the warnings dialog so I have collated a number of my wish list items I have on the subject as well as other useful ideas I have read over the years on forums & blogs. In no particular order they are... 
  1. We should be able to 'Ignore' or 'accept' warnings we no longer want to see. This way, we get a true value of warnings to be concerned about in the project. We can't always please Revit and all its rules. Trying to create zero warning files is not a recommended endeavour. So this feature is a must
  2. When clicking "show" we should be able to nominate view types or specific views to search through. The number of times we are taken to a roof plan, site plan or worse elevation trying to see an internal door on ground floor is almost a running joke 
  3. It would be useful to be able to assign priority to "types" or "categories" of warnings - perhaps through a warnings 'options' dialog. Eg: Calculation warnings or duplicate warnings being given top priority etc
  4. With priority comes sorting. Being able to sort warnings by date to get the most recent warnings, or by user would be helpful. Sort by category is another example, so rather than see all warnings under 'duplicated type marks' I can sort by category and see all warnings effecting doors for instance
  5. We need an "isolate" button that isolates the offending objects in view. There are apps for this already that also colour code objects. It's an invaluable tool and would be great if it was tied into the rest of this list
  6. The ability to leave the warnings dialog open while resolving problems. We shouldn't have to close this dialog while working on warnings. Some warnings can be resolved by simply adjusting a parameter such as a base offset, type mark or similar. This could be achieved if the dialog could be kept open while being able to work in the model environment making fixes on the fly. As previously mentioned this would be solved if the warnings dialog was a palette 
  7. The ability to expand the size of the warnings dialog box. This has been applied to a number of dialog boxes over the last few releases, not yet the warnings dialog. Solved if it went to a palette design
  8. We often amend objects in Revit that affect dimensions. We are sometimes presented with a warning to proceed with the change via a warning to delete dimensions. Sometimes we can click 'Show'. More often than not, we can't or worse, Revit deletes the dimension first, so then when you click 'Show' it says 'No good view could be found'. If we don't click delete, we can't move forward. (In other words, you don't have a choice). I would like an option to see WHICH dimensions are being deleted before I am forced to remove them. This is currently flawed functionality for a software that is supposed to AID in coordination

  9. Warnings tagged with the user name that originally generated them. This would help tremendously with user training, responsibility and model management. This is not intended as a blame game tool, but understanding where errors occur can greatly aid in improving processes 
  10. We often want to copy ID's from warnings to select those objects using ID selection. At the moment, you have to remember the number or generate a report to copy and paste. A 'Copy ID's of Checked Items' button would be excellent for this purpose. This wish may prove void if item 5 were addressed or could be part of the function 
  11. Help menu provides advice to fix certain types of warnings. This should be accessible in the warnings Dialog. "See more Help on this warning" for example. It would help new users resolve issues they are unfamiliar with or provide steps to identify possible causes or methods to resolve the warning
  12. Pop up warnings should need acknowledgement by clicking 'OK' to stop them disappearing. Users can plow ahead and ignore simple stuff, slowly racking up silly warning messages. This is particularly evident when training my students or clients, some warnings go by so quickly users don't even see them. This could act like balloon notifications, giving you the option to adjust settings for warning dialog duration, transparency & approval etc.
  13. An option to 'expand' or 'collapse' all warnings! This should be a standard function whenever these types of + sign trees are used in my opinion. It's the 21st century, this should be standard stuff written into software. The fact we have to request it is ridiculous. (While your at it, how about getting this into the project browser too)
  14. Currently when selecting elements with warnings, the 'Show related Warnings' in the contextual ribbon displays. The interface could be improved by displaying a warning icon, on or above the object instead. Clicking the symbol would open the relevant warning as it currently does via the contextual ribbon. An alternative would be to introduce another selection colour for an object that has a warning associated with it
  15. Warnings relating to objects in closed worksets should be indicated to reduce confusion. Perhaps in brackets next to the warning it can say 'Workset is currently closed'

    So, is there anything I missed? Post in the comments if there is function you would like to see from the warnings tools. 

Thursday 1 September 2016

Do You Customise Your Quick Access Toolbar?

I think the Quick Access Toolbar in Revit is an underutilised tool. I very rarely see my clients or students use it beyond its default setup. The quick access toolbar (QAT) resides by default at the top of your screen adjacent the Revit application menu. 


The QAT has a setting drop down arrow on the far right. Here you will find options to dock the toolbar below the ribbon instead of above it. You can also turn on and off the default icons. The best thing though, is you can add your own tools from other ribbons to the QAT instead of having to switch between ribbons all the time. To do so, simply right click on a tool in one of your ribbons, and if Revit allows, select 'Add to Quick Access Toolbar'. 

Sure, in most cases you could just add a keyboard shortcut instead, but some people prefer a visual setup as opposed to using their memory all the time. I am a big user of keyboard shortcuts myself, but I usually reserve assigning keyboard shortcuts to tools I use on a daily basis. So many of the tools I add to my QAT, are tools I perhaps use less often, tools accessed via drop down menus or to keep the icon in view for quick feedback.

For example, the 'warnings' icon is on my QAT because I can quickly identify if there are warnings in my project/family files simply by seeing if the icon is active or not. Show Mass is another example of easily identifying if the tool is active in the view.
Settings & paste functions is an example of tools with drop down menus that are useful to have on hand much of the time as well. I also have shortcuts for most of my daily paste functions. 

There is no hard and fast rule to a good setup, it's going to be different for everyone. If you prefer your icon interface and want to reduce the amount of ribbon switching you are doing, the quick access toolbar might be what you are looking for.


There is a downside I should mention. The QAT setup and order of icons cannot be saved to the Revit.INI file. So with each upgrade or switch of a computer you will have to set it up again, or go without. That happens once a year for me, I can live with that.